
Urban apartment living often requires compromising on square footage, and the bathroom is frequently the most constrained room in the layout. A cramped bathroom can easily feel cluttered, chaotic, and frustrating during busy morning routines. However, limited floor space does not mean you have to sacrifice elegance, utility, or comfort.
Smart interior design relies on spatial awareness, visual tricks, and multi-functional fixtures. By rethinking the layout, using underutilized vertical zones, and choosing the right materials, you can transform a tiny apartment bathroom into an open, functional, and organized retreat.
Rethinking the Layout and Core Fixtures
The fundamental layout of your primary plumbing fixtures dictates how smoothly the room functions. In a compact footprint, standard-sized fixtures can overwhelm the space and block walking pathways.
Floating and Wall-Mounted Vanities
Traditional floor-mounted vanity cabinets consume significant visual and physical floor space. Replacing a bulky cabinet with a wall-hung floating vanity creates an unbroken sightline across the bathroom floor, tricking the brain into perceiving a larger area.
-
Open Floor Area: Exposing the floor underneath the sink makes cleaning simple and provides a designated spot for low-profile woven baskets or a non-slip step stool.
-
Streamlined Profiles: Many modern floating vanities feature shallow front-to-back depths, preserving precious walkway width without eliminating essential drawer storage.
-
Under-Cabinet Illumination: Adding a strip of soft LED lighting beneath a wall-hung unit adds depth and creates a warm, spa-like ambiance at night.
Compact Toilets and In-Wall Tanks
Standard two-piece toilets project far into a room, often interfering with shower doors or entryways. Opting for a compact-elongated bowl or a wall-hung toilet system saves valuable inches.
-
In-Wall Water Cisterns: By mounting the water tank inside the wall cavity behind the drywall, you can save up to eight to ten inches of front projection.
-
Corner Toilets: If your bathroom configuration is unusually angular or narrow, a triangle-tank toilet tucked into an unused corner frees up central floor space.
-
Integrated Bidet Seats: Replacing standalone hygiene products with an integrated bidet toilet seat reduces clutter while adding high-end functionality.
Walk-In Curbless Showers
Traditional shower-tub combinations break up a small room with high walls and opaque curtains. Replacing a bathtub with a continuous curbless walk-in shower immediately opens the entire room.
-
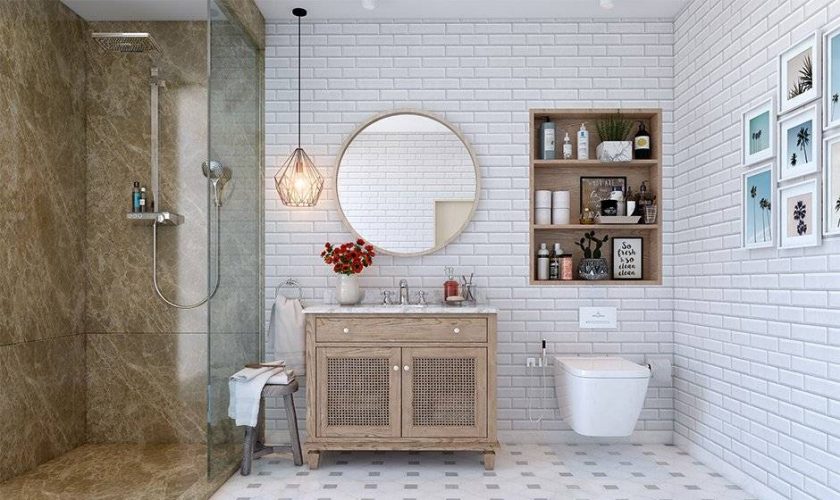
Frameless Glass Enclosures: Clear glass panels allow light to flow freely and eliminate visual barriers, making the entire bathroom feel like a singular open room.
-
Continuous Tile Flooring: Running the same floor tile seamlessly from the main bathroom area directly into the shower floor expands the apparent visual boundaries.
-
Linear Trench Drains: Installing a single-slope linear drain along the back wall removes the need for a center drain, allowing the use of large-format tiles without awkward cuts.
Mastering Vertical and Recessed Storage
When horizontal surface area is scarce, the best direction to build is up. Walls provide abundant, untapped potential for storage and organization that keeps counter surfaces clear.
Recessed Wall Niches and Medicine Cabinets
Building storage directly into the wall cavities between structural wall studs is one of the most effective ways to add storage without taking up an inch of usable room volume.
-
Shower Wall Niches: A tiled niche inside the shower stall keeps shampoo bottles, soap bars, and razors off the floor or hanging wire caddies.
-
Recessed Mirrored Cabinets: Swap standard surface-mount mirrors for mirrored medicine cabinets framed flush within the wall cavity. You retain a clean, flat aesthetic while gaining hidden storage for toiletries and medications.
-
Over-the-Toilet Wall Insets: Carving shallow recessed shelving into the drywall above the toilet provides an elegant display space for rolled hand towels, small plants, and fragrance diffusers.
Strategic Over-the-Toilet and High-Wall Shelving
The vertical wall space extending from the top of the toilet tank to the ceiling is often completely ignored in apartment bathrooms.
-
Floating Ladder Shelves: Open floating shelves crafted from light-toned timber or tempered glass add multi-tiered storage without the heavy visual mass of solid wood cabinets.
-
High Perimeter Storage: Installing a single continuous shelf high on the wall just below the ceiling creates an unobtrusive zone for storing extra rolls of toilet paper, seasonal items, and surplus linens in labeled canvas bins.
-
Back-of-Door Racks: Hanging low-profile multi-hook racks or hanging canvas organizers over the back of the bathroom door keeps daily robes, towels, and hair styling tools off the walls and counters.
Visual Design Strategies to Expand Perceived Space
Beyond physical dimensions, the way human eyes perceive room boundaries depends heavily on lighting, color harmony, and surface reflections.
Strategic Mirror Placement
Mirrors reflect natural and artificial light, immediately doubling the perceived visual depth of a room.
-
Oversized and Wall-to-Wall Mirrors: Installing a single large, unframed mirror spanning from the edge of the vanity across to the adjoining wall creates the illusion of an adjacent room.
-
Backlit Mirrors: LED-illuminated mirrors provide balanced, shadow-free illumination for grooming while eliminating the need for bulky, wall-mounted light fixtures that project into the room.
-
Opposing Mirror Angles: Placing a secondary decorative mirror opposite an open doorway bounces light entering from the hallway back into the bathroom.
Color Palettes and Light Reflectance
Dark, saturated paint colors can make wall planes feel like they are closing in. A cohesive, bright, and airy color strategy opens the room up.
-
Monochromatic Schemes: Utilizing subtle tonal variations of soft white, warm cream, or light grey on walls, tiles, and ceilings eliminates harsh dividing lines.
-
Vertical Tile Stacking: Installing subway tiles vertically instead of the traditional horizontal running bond pattern leads the eye toward the ceiling, creating an illusion of taller vertical clearance.
-
Gloss and Satin Finishes: Selecting tiles and semi-gloss paint finishes with high light reflectance helps bounce light around dim, windowless bathrooms.
Space-Saving Comparison Overview
| Element | Bulky Traditional Option | Compact Modern Alternative | Primary Space Benefit |
| Vanity | Floor-standing cabinet | Wall-mounted floating vanity | Clears visible floor area and simplifies cleaning |
| Shower Barrier | Opaque curtain or framed door | Frameless fixed glass panel | Eliminates visual interruption and opens sightlines |
| Toilet | Two-piece standard floor mount | Wall-hung unit with in-wall tank | Recovers up to ten inches of front projection |
| Mirror | Flat decorative hanging mirror | Recessed mirrored medicine cabinet | Hides daily countertop clutter behind the wall plane |
| Storage | Free-standing floor linen tower | Vertical floating or recessed wall shelving | Maximizes overhead space without blocking walkways |
Multi-Functional Accessories and Hardware
Carefully chosen hardware accessories provide essential storage solutions without cluttering limited surfaces.
-
Pocket Doors and Sliding Barn Doors: Traditional hinged swing doors require a wide radius of clear floor space to open. Installing an interior pocket door that slides into the wall framing recovers several square feet of functional floor area.
-
Heated Towel Bars: A slim, wall-mounted vertical towel warmer dries multiple wet towels efficiently, eliminating the need for bulky standalone towel racks or overfilled floor baskets.
-
Magnetic Grooming Strips: Placing a discreet magnetic strip inside a vanity drawer keeps bobby pins, nail clippers, tweezers, and small grooming scissors secured in one tidy spot.
-
Tiered Drawer Organizers: Custom drawer inserts divide deep vanity pull-outs into multi-level compartments, preventing small cosmetic items from getting lost in messy piles.
Transforming a compact apartment bathroom requires an intentional balance of clean layout design, smart vertical organization, and bright visual materials. By adopting floating fixtures, utilizing recessed wall framing, and using frameless glass, you can create a practical, comfortable room that feels surprisingly open and uncluttered.
Frequently Asked Questions
Can I install an in-wall toilet tank in a rented apartment?
Installing an in-wall toilet tank generally requires cutting into drywall and altering existing plumbing runs, which is typically prohibited by standard apartment lease agreements. Renters should instead explore non-invasive alternatives, such as low-profile over-the-toilet storage shelving, adhesive hanging organizers, or tension-pole corner shower caddies that require no permanent alterations.
How do I prevent moisture and mildew buildup in a small, windowless bathroom?
In windowless spaces, active ventilation is critical to prevent mold. Ensure your exhaust fan matches the room volume by choosing a model rated for sufficient cubic feet per minute airflow. Run the exhaust fan during every shower and leave it active for twenty minutes afterward. Alternatively, install a compact plug-in dehumidifier and use mold-resistant paints and anti-microbial grout additives.
What is the ideal vanity height for a floating installation in a small bathroom?
The modern standard comfort height for a floating vanity is between thirty-four and thirty-six inches from the finished floor to the top of the counter or sink basin. Installing the unit at this height prevents awkward bending while preserving eight to twelve inches of open clearance below the base of the cabinet for low-profile floor storage.
Are pocket doors soundproof enough for apartment bathrooms?
Standard hollow-core pocket doors provide less acoustic isolation than traditional hinged solid doors due to small perimeter gaps around the track. To improve privacy and sound dampening, choose a solid-core wood pocket door slab, install specialized brush seals along the jamb edges, and add acoustic insulation inside the surrounding wall cavity during installation.
What size tile works best to make a tiny bathroom look bigger?
Large-format tiles measuring twelve by twenty-four inches or larger work exceptionally well in small bathrooms. Larger tiles require fewer grout joints, creating a clean surface that makes the floor and walls feel expansive. If using smaller tiles like penny rounds or mosaics, select a matching grout color to avoid high-contrast grid patterns that make the room look busy.
How can I add extra lighting without hardwiring new electrical lines?
You can incorporate battery-operated or USB-rechargeable wireless LED light bars and puck lights. Mount them beneath floating shelves, inside vanity cabinets, or behind mirrors using removable adhesive strips. Many of these lights feature remote controls, motion sensors, and dimming settings, providing modern accent illumination without complex electrical renovations.
Is a fixed glass shower screen practical, or will water splash onto the bathroom floor?
A fixed glass shower panel is practical if the shower footprint is at least forty-eight to sixty inches long and the glass panel covers at least thirty to thirty-six inches of that length. Positioning the showerhead so water sprays directly down or toward an opposing tiled wall prevents water from splashing onto the dry areas of the bathroom.